
Last Updated on December 3, 2023
How To Make A Wooden Baseball Bat? Why did I choose this topic in this era when top companies like Marucci, Wilson, Easton, and many other brands are making awesome baseball bats?
I still remember the time when my father gave me my first baseball bat. It was more than 20 years ago. Lots of time has passed. I have used many brands and pine-tarred the handles. Most useful was the one-piece bat from Louisville certainly, but even that could not give me the feel of that handmade lumber for my childhood practice.

I guess, a handmade bat is a work of art passing from one generation to another, if you can make it, it may sustain a lifetime. And your next generation can take pride without any doubt.
My father, after 4 years of my first practice when I was 11, taught me how to make one wooden bat for myself. And whenever I get to teach my students the first rule of batting, I tell them to make their own wooden bat first. You should try it too as it is the mark of passion you have for the diamond pitch.
Now, let’s start without further delay about how to make a wooden baseball in some easy steps:
What you need to make a wooden baseball bat
Certainly, you don’t need a full-fledged workshop for making your first wooden baseball bat. But using a workshop will give you a certain advantage.
For myself, I can say that I take my students to my own workshop as I already have all the supplies there. But you can just use one at hand.

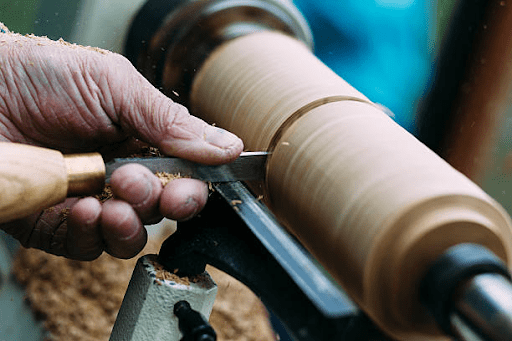
Lathe Machine
Even if you do not need to go to a workshop for making the bat, you will need a lathe machine. Benchtop lathe machines won’t do as they cannot fit the workpiece.
A wood lathe which has the capacity to work with a minimum 36 inch piece of bat making workpiece can cost $500-$2000. It depends on the quality of the lathe.
Next, you will need –
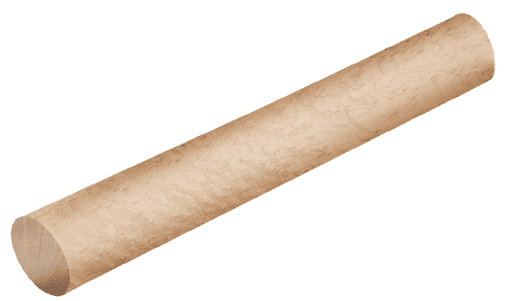
Wood blank
Wood blanks are easy to obtain from your nearest store. Or if you are looking for an adventure, then you can obtain it yourself.
And if you like this crazy idea, then you just make sure you are ready to go the extra mile to find a cylindrically even piece of 36-inch wood.
For the record, traditionally baseball bats are made with ash wood. The other variations are – maple, hickory, birch, and bamboo.
Hickory wood is heavier than others and that’s why they are less used. On the other hand, bamboo bats made out of adjusting bamboo pieces are light and durable but commercially it is not that popular enough.
Maple wood is easy to deal with and has great durability. So, my suggestion would be to use maple or ash wood for your project.
A 36-inch maple wood blank will cost you a minimum $30 to $50 depending on how prepared and qualities the wood is.
Measuring tools
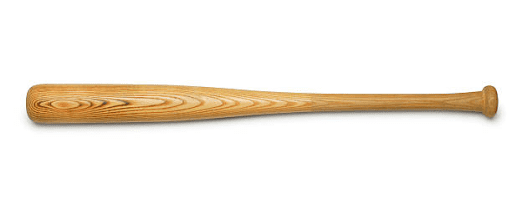
A baseball bat is not solid in shape. It has different diameters at different lengths. We are going to make a 34-inch wooden baseball bat. For this, you need to know the diameters at different lengths.
Read carefully and keep the chart at hand while you are working. Then you will not make any mistakes.
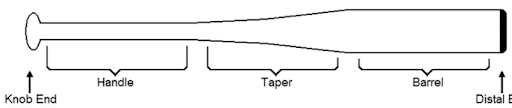
| Serial | Bat Part | Length | Diameter |
| 1 | Knob | 0’’ | 2’’ |
| 2 | Grip | 4’’ | 1’’ |
| 3 | Grip | 8’’ | 1’’ |
| 4 | Grip | 12’’ | 1.125’’ |
| 5 | Taper | 16’’ | 1.25’’ |
| 6 | Taper | 20’’ | 1.75’’ |
| 7 | Barrel | 24’’ | 2.19’’ |
| 8 | Barrel | 28’’ | 2.45’’ |
| 9 | End | 34’’ | 2.5’’ |
Table: Baseball Bat Parts And Diameters
To make the bat, you will need to measure every 4-inch length’s diameter. So, you will need good measuring tools for that.
I recommend two calipers for your project –
A spring caliper and a Vernier caliper. Together they may cost you around $30-$50. If you go for a good digital Vernier caliper, then it will cost you some extra. Plastic Vernier Calipers are cheap. It May cost you even less than $10.
Besides, you will also need a measuring tape available at your hand.
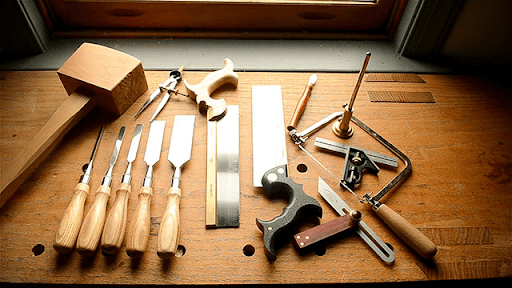
Other tools
A saw, a roughing gouge, a skew chisel, a gouge chisel, and a pencil. This part may cost you $100-$150 in total.
Finishing
For the finishing, I will be using sandpaper, oil, and varnish. You can buy them according to your budget. Roughly you will have to spend $15-$20 here.
Hey, do you know which bats are illegal and what you can not do with your bat? Read my article on illegal baseball bats.
Budget for The Handmade Wooden Baseball Bat
So, if you are going to use a workshop already existing and available for your use, then you will just need to buy the blank, optional measuring tools, and finishing materials. Cost you less than $100.
Otherwise, if you are willing to set up a workshop for yourself and do some other stuff too, you may need $800-$1K for that.
How to make a wooden baseball bat step by step
I think I got you pretty clear about the budget and where you need to spend it. If you are clear about that and willing to take the risk to make the first wooden baseball bat yourself, then you should see how the lumber is made.
Now, I will be described step by step the whole process. Believe me, it is not as easy as it sounds, but satisfactory in the end. I promise you that.
Step – 1: Find out the center and set up the log
You should find out the center point of the log with your measuring tools first. Use the pencil to cross out and find the center. Then use the lathe’s head and endpoint to set it up on the lathe.
Step – 2: Tool Rest setup
Now you should set up the tool rest perpendicular to the log.
Step – 3: Measure the log and mark it
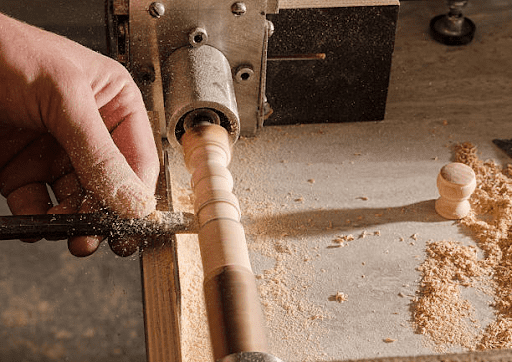
Now, you should mark the log with your pencil every 4 inches. You have seen the chart that every 4 inches the diameter changes. So, it is crucial to mark the places perfectly. I assume you already have a cylinder-shaped log. Otherwise, first, turn the lathe on and give it a symmetrical cylinder shape.

Step – 4: Turn on the lathe and use the roughing gouge
Now, it is time to get your hands dirty. Use the roughing gouge to mark every 4 inches. Put the gouge softly on the pencil marks and keep the lathe on. The wood will be chirped and the work will be done. Don’t forget to use the measuring tools to make sure you did not curve deeper than you need.
Step – 5: Start from the barrel
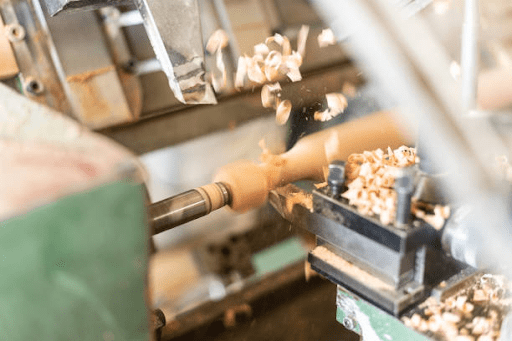
Now, you should start from the barrel. As you have made marking paths every four inches with the gouge, you should use the same technique to remove the wood from the log with the gouge. Start from the widest part of the barrel and go to narrower parts towards the tapper. Always use measuring tools to see if the diameters are alright. Keep the lathe machine at 1000-1500 rpm.
Step – 6: Do the Taper
The taper is a very tricky part. You should be careful and use the spring caliper, again and again, to see if the diameters are okay. Use the skew chisel to get the perfect shape.
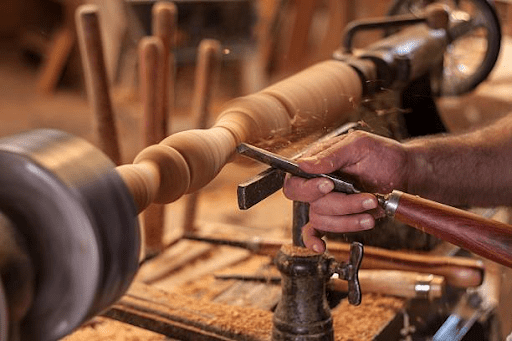
Step – 7: The gripper
Among all the parts, the gripper and knob are the most tricky parts. As the diameter gets narrower, it is very problematic to get the perfect shape. Use the gouge chisel from wider to narrower parts to remove the woods. And you should be lowering the lathe speed for this part. You can keep it from 500-600 rpm.
Step – 8: The Knob
Just like the gripper, you will need a combination of tools to give the knob the perfect shape. You should use the skew chisel, the roughing gouge, and the parting tools to blend the gripper into the knob. The knob is perfectly round. So, you should make the lathe slow and use the gouges to give it the shape you need.
Step – 9: Balancing
Make sure the barrel and the handle’s joint are perfect in diameter by using the Vernier caliper. It should be balanced for a good hit.
Step – 10: Finishing
Use sandpaper to give the perfect finishing. After you are happy with the smoothness, then please use good finishing for it to last a lifetime. I use varnish, thinner, and oil all one-third to make a mixture. Then rub it over the bat for the finishing.
Words of Caution
You should be careful while you are using the lathe machine. The end and the head are pointy parts. And never try to set up the log on the lathe while it is on. Even if it gets down while you are working, you should stop the lathe first and set it up again.
We have some fantastic bat reviews also:
- Marucci Cat 7 BBCOR Reviews | Side By Side Details
- Marucci F5 Reviews & Comparison With Others (Best budget bat)
- Marucci CAT 7 Vs CAT 8 BBCOR – A Complete Comparison
- Louisville Slugger Solo 618 BBCOR Review
- Louisville LXT VS Xeno | A Side By Side Comparison In 2022
Frequently Asked Questions
Is it hard to make a baseball bat?
A wooden baseball bat is easy to make, depending on the availability of the tools and machines and your budget. If you are a rookie player, then you should spend some time making a classic-style bat. It will give you a good picture of where the balances lie in the bat. The whole project is very fun to execute.
2. What materials are used to make a baseball bat?
Most of the wooden baseball bats are made of ash wood. After that, maple is the most popular. Hickory and birch woods are also popular in some cases. But for the heavyweight, hickory is losing the popularity it once had. On the other hand, bamboo bats did not gain much popularity once. But now it is liked by many
3. What wood is best for a baseball bat?
Traditionally, ash wood was mostly used for making baseball bats. But nowadays maple woods are the most trendy. It has good durability and strength. The shapes are also better and more balanced. Most MLB bats are now made out of maple logs.
4. How much does it cost to make a baseball bat?
In the factories, depending on the wood, a baseball bat may take $50-$100. But the lengths and quality vary from time to time. As a result, you can even find wooden bats that cost $20-$30.
5. How wide is a baseball bat knob?
A baseball bat knob is around 2’’ in diameter. It helps to balance the grip on the handle. You can also customize it with your own choice. But 2’’ is the best diameter.
Conclusion – How to Make a Wooden Baseball Bat
Making a baseball bat is fun. Again, I say it is not as easy as it sounds. Still, you cannot say it is not fun after you go through all the steps. If you can get the perfect shaped bat you deserve for your practice and matches, then you will have a sense of achievement. Moreover, you will always remember the day you made your first bat.

Hello everyone. My name is Jason Butler, and I live in California, America. I was a professional AAA Minor League Baseball player. I lost my chance of playing MLB for injury issues, but I did not lose my love for baseball. I attended the coaching training program and am now working as a coach in a small school in San Diego.
I always love to share my experience and knowledge if that can help you. Play baseball, and stay fit.