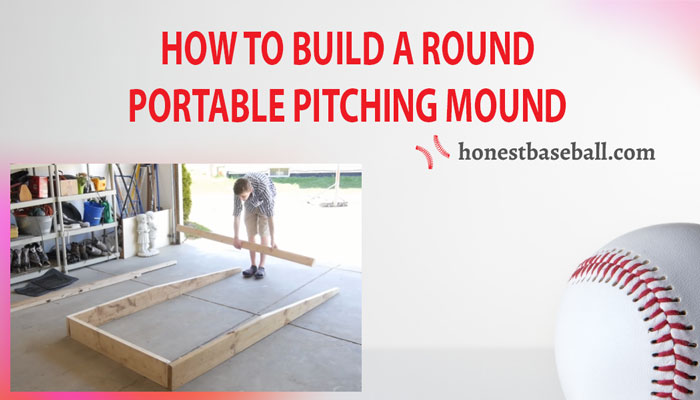
Do you know how vital a pitching mound is for baseball or softball pitching practice? The issue is that obtaining access to a permanent pitching mound is difficult. And more importantly, it is hard and costly to maintain one. I’ll show you how to build a round portable pitching mound to solve this problem.
And how much does it cost to build a pitching mound? If you are building a portable pitching mound, It will cost you less than $150 and save you up to $200.
Here, I’ll go over everything you need to know and walk you through each step of making a portable pitching mound.
What is a Pitching Mound

In every baseball or softball game, the pitcher stands on a “Dirt Hill” while pitching. This dirt hill is known as Pitching Mound. Which has a flat base no more than 10 inches above the ground. In addition, the floor has a rubber plate. The front has a downslope with a maximum length of 6 feet.
History of Pitching Mound
It’s around the year 1860. Baseball had become well-known by this point. Yet, some rules and styles were also missing. For example, they did not have a pitching mound at first. They used to mark the pitching area with a flat plate.
The pitching mound’s idea came in 1893 when they began placing a rubber plate to raise the ground for the pitcher. This started to give pitchers an advantage with a faster pitching speed.
The MLB then began regulating the pitching mound in 1914. Back then, the pitching mound base was 15 inches above the ground.
And, in the present days, it is sure to have 10 inches in height. The pitching mound slope angle must have descended one inch per foot, over six feet long.
Many businesses and clubs began to wonder how they could reduce the cost of a pitching mound. However, how to build a round portable pitching mound was initially challenging to answer. Because no one imagined it could become portable.
Then John Montgomery Ward came to solve the problem and gave the idea of building a portable pitching mound.
Why You Need a Portable Pitching Mound
As a training tool, a portable pitching mound can be extremely useful. This will provide you with more facilities than a standard permanent pitching mound. In short, you will save money because there will be no need for costly maintenance. And your players will be able to use it for a long time.
A permanent pitching dirt mound is an expensive construction project. It also necessitates ongoing maintenance by a skilled groundskeeper.
Each league has its own dirt mound dimension. As a result, the mound must be inspected and rebuilt before each game. That takes a lot of time and costs a lot. That is why, if you (your park, team, or stadium) have a portable pitching mound, you will not need the services of a groundskeeper. It is not even necessary to rebuild it before each game.
Consider the weather. You can not practice outside on rainy days or during a snowy winter. However, if you have a portable pitching mound, you can practice at any time. Simply place it in your garage, basement, or gym and begin practicing. It’s really that simple.
As there is a significant backlog for a permanent pitching mound. For these reasons, when the portable pitching mound first entered the baseball community market, it was a huge success.
If you are stuck at home and can not join you team to practice, we have a perfect plan for you: How to practice pitching alone
Different Pitching Mound and the Size
Before making or purchasing a portable pitching mound, you should consider who you are buying or making it for. Because there are some fundamental requirements:
- A 6 inch portable pitching mound or a permanent one will be ideal for under 11.
- 8 inches are suitable for players aged 12 to 14.
- 10 inches are permitted in MLB games for those over 15.
Make the portable pitching mound according to the basic requirements for practice or in-game use.
Want to know more about different sizes of pitching mound, read our guide on Beginner’s Guide To Pitching Mound Dimensions
Buying VS. Building
Which one is better to do? Building a portable pitching mound or buying a new one? It is entirely up to you. So before knowing how to build a round portable pitching mound. You should understand some pros and cons.
- If you are familiar with the fundamentals of woodworking. If you have the time and the right tools and know-how to combine the tools and materials. I believe that building a portable pitching mound is a better option for you. This can be an enjoyable project for you.
- It will give you a lot of satisfaction if you can perfectly build a portable pitching mound. Most importantly, you will feel proud when your child or team uses it.
- It will be less expensive to build one than to buy a new one. As a result, you will get what you want and will not have to compromise on any requirements.
- However, if you cannot maintain and control every step of the process, building a portable pitching mound can become an inconvenient process. You must be patient because this is not a child’s game.
So, if you think you’re ready to build a portable pitching mound, go ahead and do it. On the other hand, if you are unable to make one, you can easily purchase one at an additional cost.
If you ever wonder about buying a pitching machine for your batting practice, I hope you will find this article helpful: Are pitching machines good?
Tools You Need Building a Portable pitching Mound
Before you begin constructing a portable pitching mound, make sure you have all of the necessary tools. They are as follows:
- Table saw, or Circular saw
- Large spike and screws
- Hammer
- Electric screwdriver
- Measuring Tape
- Gloves and Safety Glass
- Sand Paper
- Wood Glue
- Staples
- Liquid Nails
Recommended Materials for the Pitching Mound
You are going to need,
- Clamp set
- Caster Wheel 2p
- Roll of Turf
- Width 4f/ Length 10f Plywood Board 5p
- A good quality rubber plate
DIY Portable Pitching Mound Plans (Initial Measurements)
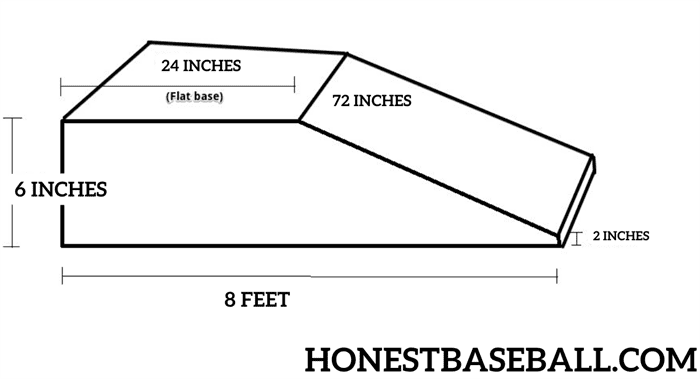
I am targeting 8 to 13 years old for this portable pitching mound. As a result, the measurements will be for 6 inch portable pitching mound:
- Height above ground – 6 inches (Sideboards’ Max height)
- Standing Flat Base – 40 inches Length
- Backboard – 48 inches length
- Front Slope – 72 inches in length and width
- Front End Slope height – 2 inches
- Base length – 96 inches
Try to have these features in the 6 inch portable pitching mound
- It must have a stable foundation. So that it does not bend due to the pitcher’s body mass.
- Put a rubber layer under the ground touching part of the frame. This is because it will help the mound to grip the floor. And with that rubber layer under the mound will also protect the floor from scratching.
- Try to design it in Origami style; as a result, you can fold it up and put it anywhere in no time.
- Make use of high-quality, smooth turf. As a result, the pitcher can stand comfortably.
- Make this portable pitching mound plans with wheels. Because without wheels, it will be hard to carry them around.
To know about Building Portable Pitching Mound watch this video
Procedures of Building a Portable Pitching Mound
Now, we will see how to build a round portable pitching mound. Where you will find it is easier to build on than buying (according to the Economic and Requirement point of view).
Front and Rear Part
- First, take a piece of plywood. Make a 48-inch length. And 6 inches in width. For a straight cut, use a table saw.
- Then, take a second board and make the same cut except for the height space. For this one, the width will be 2 inches.
You now have two pieces of plywood that are ready to use. One for the back end and one for the front end of the portable pitching mound.
Center Support
- Take four 8-foot-long by 6-inch-wide boards. Place one in front of you. one is the left side, and the other is the right side of the plywood (From your Point of View).
- Take 24 inches of length from the left end and mark the point. Then, draw a straight line from that point to the right end. As it is a 6 inch portable pitching mound. So the starting point is 6 inches high, and the line descends to the right end and stops at 2 inches in height.
- Cut the wood board along a straight line with a table saw. And there, you will get the perfect pitching mound slope angle.
This plywood board now has four major components.
- The first is the 6-inch-high rear end.
- A front end that is 2 inches tall.
- The flat base measures 24 inches long.
- Finally, there’s a 72 inches long straight slide with a 2-inch height end.
Repeat the process to create three more identical shapes. These will be the mound’s direct support.
Stand Base and Slope
- Take a plywood board and make a 48 inches width and 24 inches length shape. One will be used for the standing base. While the other will be used for the downslope with 48 inches in width and 72 inches in length.
Secondary Support
Try to make the mound more stable. You will need to make extra supportive boards for the center support.
- You’ll need 21 rectangular wood boards that are 11 inches long and 5 inches wide.
The Round Portable Pitching Mound Plans (Step by Step)
Before putting everything together, use sandpaper to smooth out any rough edges of those pieces.
Step 1
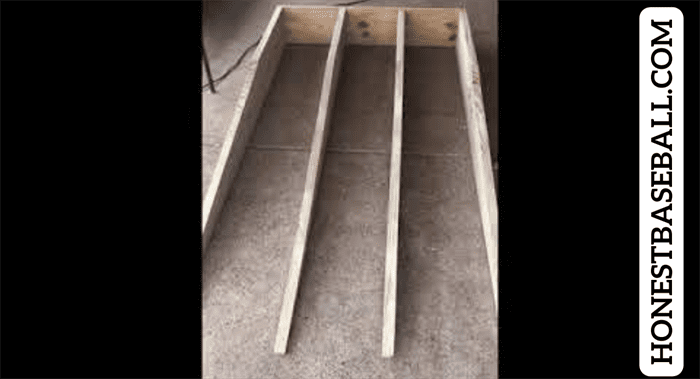
Place the back and front parts parallel to each other. Screw the four center support parts horizontally to the front and back boards.
Step 2
Screw the standing plate and slope to the top of the base structure. Make sure the wood boards are perfectly aligned. And be careful about the pitching mound slope angle.
Step 3
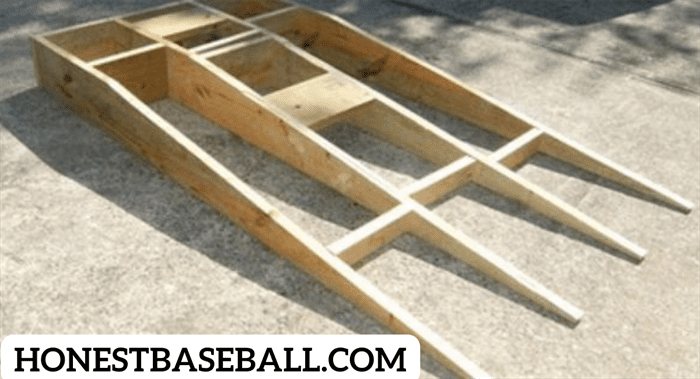
Now, for more stability, place those secondary support logs beneath the mound. Put one on every one-foot gap. Assemble those to touch the standing base and slope along with the center support beams. Align them horizontally, making sure the plywoods are flush on all sides.
Now, make a pitch while walking on the mound. If you believe it requires more support beams, add the necessary number of supports.
Step 4
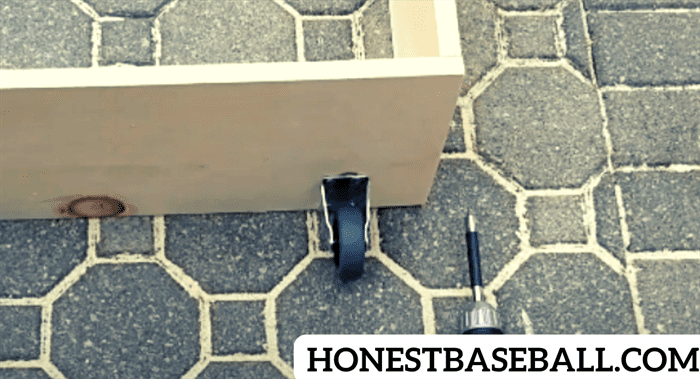
Add two Caster Wheels to the rear board so that the wheel can touch the ground and transport the mound. You can also add a handle to make it easier to carry around.
Step 5
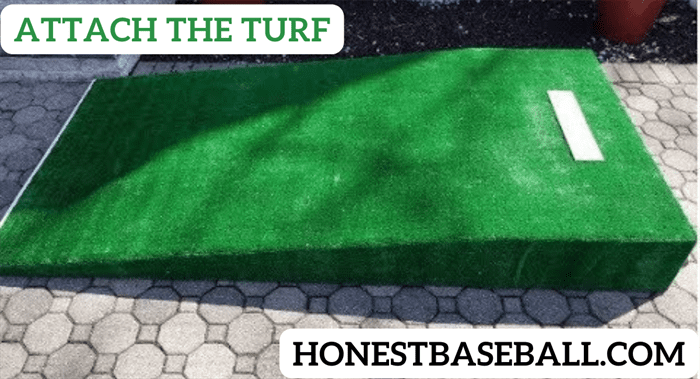
Cut the turf into 8-foot lengths and 48-inch widths. First, apply glue to the pitching mound’s surface. Then the turf should be carefully attached to it.
Now, attach the rubber plate in the center of the standing base.
Step 6
Apply Liquid Nails to all necessary joints. Then, attach a thin rubber layer to the bottom, which will contact the floor. It will make the pitching mound’s grip on the floor more stable. Besides, it will protect the floor from scratches.
Some Concerns after Making a Portable Pitching Mound
- Due to a measurement issue, the edges begin to stick up over time. So, if this happens, figure out what is wrong. Check that no mud or pebbles are stuck to the edges.
- When picking up the pitching mound, make sure you pick it up at the proper angle. As a result, the wheel can carry the majority of the weight.
- Always place it on level ground.
- Do not use it right away after you make it. Allow enough time for the pitching mound to dry out all the glue and liquid nails. So it becomes more durable.
- Do not stand on it while wearing a metal spike boot.
If you don’t want to face all these troubles and want to buy a Portable Pitching Mound for under $100, you can read this blog and buy one to save time and concentrate more on your game.
Frequently Asked Questions
Why does baseball have a mound?
Answer: For pitchers, the mound helps them use their momentum more precisely and throw the ball faster.
How far is the pitcher mound for 9-year-olds?
Answer: For a 9-year-old kid who is under the Little League program. There the pitching mound will be at 46 feet in distance.
How to build a lightweight portable pitching mound?
Answer: Use high-quality plywood, which is durable and lightweight.
How much does it cost to build a pitching mound on the field?
Answer: A medium quality pitching mound will cost you more than a thousand dollars to make. And additionally, the maintenance will cost you more.
Conclusion
If you recall the recent pandemic, you may have noticed that everyone was quarantined. Like everybody, it was also a terrible period for players. Because they couldn’t practice in groups.
You can also consider lousy weather days. You are unable to go outside because it is raining or snowing.
As a baseball or softball player, you or your child must have felt the need for a portable pitching mound in this case.
You can buy or build a pitching mound to meet that need. And at this point, if you know how to build a round portable pitching mound (assuming you have a basic understanding of carpeting), you should create one. That will cost you less than $150 and one day of your time.
This article, I believe, will assist you in building a portable pitching mound.

Hello everyone. My name is Jason Butler, and I live in California, America. I was a professional AAA Minor League Baseball player. I lost my chance of playing MLB for injury issues, but I did not lose my love for baseball. I attended the coaching training program and am now working as a coach in a small school in San Diego.
I always love to share my experience and knowledge if that can help you. Play baseball, and stay fit.