Last Updated on August 28, 2023
This guide is going to be long. Because I will discuss and describe several effective baseball fielding drills to enhance your fielding ability to the top.
I am going to break the drills into three categories: infield fielding drills, outfield fielding drills, and combined fielding drills.
By the way, drills are the foundation of skills. Baseball fielding isn’t exempt from it. Whether it’s kids who are just getting into baseball or a high school baseball player, drills are a must to craft the fielding ability of the players to the top.
So, as a coach, you know the significance of being a good fielder on the field. From the shortstop to basemen to the outfield, all must be accurate to catch the ground ball to fly balls.
Young players must know how to catch the balls and how to throw them. The fielding drills in this guide will help young players to develop their motor skills with fun and love. Let’s begin.
Baseball Fielding Drills: Infield Drills
Let’s start with the infield baseball fielding drills. Here, I will go through several drills, their purposes, and how to practice the drills in groups.
By the way, don’t be in a hurry. Because the drills are not for one day. They are long-term tasks to do. So, you have to be patient and develop a strategy to go through the entire process over time.
Drill 1: Covering the First Base
Purpose:
This drill will help the first baseball to cover the first base. Also, this will work on the footwork of the players.
How to Practice:
The players will stand between the line of first base. At the same time, the coach will stand between the first and second base.
The coach will throw the ball with uncertainty. As a result, the first baseman will cover a random area to catch the ball.
The coach will keep alternating the throwing destination. Consequently, the first baseman will work in all directions.
You need to keep this drill in practice for about 10 minutes in a cycle for a group. The group should not consist of more than 4 players to execute the drill.
Immediately after receiving the ball successfully, the player will throw back the ball to the coach and go behind the line. The next player will come to the position, and the cycle will continue.
Drill 2: Covering the Bad Throws
Purposes:
The purpose of this drill is to help the first baseman field the grounded balls in the dirt.
How to Practice?
The positions of this drill are the same as the previous one.
The coach will throw the ball around the fielder in the line of the first base. You will need to throw the ball at random places with random angles.
The players must be cautious. The reflection must be fast. With random throwing, the reflection of the players will be developed.
After receiving the ball, the player will throw it back to the coach and go to the end of the line. The next player will come to the position, and the cycle will continue.
For high school players, you are recommended to use real baseball balls. For younger players, use softball balls. These won’t cause any pain and enhance their confidence level.
By the way, don’t use tennis balls for this drill. Because tennis balls won’t be able to create the right hops.
Drill 3: Short-Hop Drill
Purpose:
The short-hop drill is to enable the players to catch the balls from the place by not moving as short hop in front of them.
How to Practice?
This drill can take place with a group of many players at a time. The drill will happen in pairs. Two groups of players will take place face-to-face with each other. They will have to keep one knee on the ground and take the position.
The initial distance between them should be 6 feet.
Players will throw the ball in front of the opposite player, and the opposite player will catch the ball immediately after it drops in front of him. Then he will do it back to the opposite player in front of him.
As a coach, make sure the players throw the balls right to the players, not to any side. Also, ensure the players don’t try to adjust their positions in this setting. They will just catch the ball immediately after the ball drops in front of them.
You can continue the cycle for 10 minutes. See how to practice the drill for the shorter distance between two groups of youngsters.
With a 5-minute gap, now set the position of the two groups far from each other.
In this cycle, set the players’ stance on the knee, but the knees are not on the ground. Players will be down, as well as the catching hand. Players from the other side will throw the ball.
In this setting, players can adjust their position when the ball is in the air. They can either come close to the landing point of the ball and grab it immediately after landing. Or, they can slightly go back and catch the ball at a higher point after the bounce.
This is a longer version of a short hop. This drill should take place at around 15 minutes in a cycle.
Drill 4: 4 Cones Reaction Drill
Purposes:
To improve the angle and accuracy of moving. It also eases the muscles of the legs and develops the ball-receiving ability.
How to Perform?
First, you have to set 4 cones on the ground. Keep each cone 10 feet away and make a square.
The player will stand in the middle of the square. Now, he will randomly approach any cones, touch them, and you (coach) will slide the ball on the ground.
The player will touch the cone and come back fast to grab the ball and throw it back to you.
See the following video for a visual representation of the drill.
Drill 5: Alligator Traps
Purposes
With this drill practiced, the players will develop their ball-receiving capabilities on the infield.
How to Perform?
This drill is among the most lovely baseball fielding drills, and all youngsters love this drill to perform.
The players will stand in a line. You will stand 10 feet away and in front of them to roll the ball on the ground to them.
The stance of the player will be like this:
- The knees bent
- The hip lowered
- The gloved hand on the ground
- The other hand above the gloved ball is like an alligator keeping its mouth open to grab prey.
Now, roll the ball to the front-most player in the line. He will receive the ball with both hands. It seems the alligator receives its dinner in the stance I mentioned above.
Immediately after receiving the ball, the player will throw it back to you and go back to the line. Now, you will roll the ball to the next player in the line.
Make sure they keep their eyes on the ball. This drill also helps to improve hand-eye coordination.
Watch the drill in the following video for great visualization:
Drill 6: Belly Up
Purposes
To increase the reflection time of players.
How to Perform?
It is actually a very fun drill for both youths and professional players.
Line up the players in a single row and tell them to lie down on the ground on their bellies.
Now, you have to step back at around 20 to 25 feet.
You will call a particular player’s name and roll or throw a fly ball toward him. The player will immediately react to your call and pop up from lying down to receive the ball.
As I mentioned, the ball can be a ground rolling or a fly ball. The uncertainty will enhance the reflection mechanic of the players quickly.
The group should be of 5 to 6 players. Do the same to the next player. After finishing up the cycle, do it for another round without any break.
Do another two rounds after a 10-minute break.
Drill 7: Pitcher’s Fielding Drill
A Pitcher’s duty is not only to pitch but to cover some fielding areas, too. So, this drill is only dedicated to the pitchers. This drill will take place in several setups with the help of other players.
Let’s go through it. This is one of the most fun baseball fielding drills, and the youngsters will love it.
Phase 1:
- Keep a bucket of baseball balls beside the home plate, and you keep the fungo.
- Send a player to cover first base.
- Tell the pitcher to simulate the pitching stance: wind up, then pitch finishing.
- The feet and shoulders square to the home plate, and the knees are bent like a real pitcher.
- Immediately after finishing the stance, you will hit the ball with the fungo to first base.
- The first baseman will field the ball, and the pitcher will run to first base.
- The pitcher will cover the first baseline and will receive the ball from the first baseman at his chest height.
- During the catching, the pitcher will touch the bag on the first baseline with his right foot.
- Complete the cycle with all pitchers.
Phase 2:
- The pitcher will repeat the pitching stance like the previous one.
- You will hit a ground ball to the pitcher.
- The pitcher will feel the ball and will field it fast.
- After fielding the ball, he will throw it strongly in the fastest time to the first baseman.
Phase 3:
- Now, send a player to the shortstop.
- The same stance by the pitcher.
- Hit a grounder to the pitcher.
- The pitcher will field and throw the ball to the shortstop while the shortstop runs to second base.
- The shortstop will then make a strong throw to first base.
Continue the drill for 3 rounds for all pitchers. Give a point to each pitcher every time who feels, receives, and throws the ball most efficiently.
You can give a treat to the fielders after the drill is finished.
Aside from the fielding drills for the pitchers, they need particular pitching drills to ensure maximum pitching performance. You can check my guide on “Pitching Drills For Accuracy |More Perfection” for specialized pitching drills.
Drill 8: Bucket the Ball
Purposes:
This is one of the pretty fun drills, where the purpose is to ensure error-free throws.
How to Perform?
This is literally one of the rhythmic baseball fielding drills. In this drill, you have to use all infield positions except the pitcher. So, you need a minimum of 5 players for this Bucket the Ball drill.
By the way, put all the balls from the bucket near the home plate. Now, put the bucket in the foul territory near third base.
- Now, start the drill by hitting a ground ball with the third baseman. Use Fungo for hitting. The third baseman will receive the ball and will throw it to the first baseman. The first baseman will throw the ball to the catcher.
Now, the catcher will throw the ball to the third baseman, and he will put the ball in the bucket in foul territory near the third base.
- Now, hit a ground ball to the shortstop. He will throw the ball to 1st base, and he will hit the catcher. The catcher will throw the ball to second base now, and the 2nd will to the 3rd. And finally, the 3rd will put the ball in the bucket.
As I already mentioned, the purpose of the drill is to ensure error-free throwing. The entire throwing will be rhythmic, and no error must be ensured.
By the way, after finishing the first cycle, you can rotate the players from their positions.
By the way, why not some hitting drills? Check out my guide on “7 Youth Baseball Hitting Drills – Hit To Stars Like A Pro!” to enhance your batting mechanics.
Baseball Fielding Drills: Outfield Drills
Here, let’s have some outfield baseball fielding drills to catch up. These drills are particularly designed for outfield positions that can’t be suitable for infield positions.
By the way, you can bring changes in the strategies based on your plan and skill to enhance the efficiency of the drills.
Drill 1: High-Five and Low-Five Drills
Purposes:
This drill will enhance the basic efficiency of catching balls. Aside from this, this will also develop quick hands and glove works. This will also reduce the dependency on gloves.
How to Practice?
The distance between the players and the coach should be at least 15 feet. The coach will throw the ball at the players from this distance.
If the ball goes above the waist, the players will keep their glove position at a high five. If the ball goes below the waist, players will catch the ball with a low-five glove position.
If the ball goes straight to the player’s waist, he needs to bend his knees and catch the ball with a high five position.
By the way, you should use real baseball or softball balls for this drill. Though some can allow tennis balls, I don’t Because, with the tennis ball, the velocity and the angle won’t be the same as the baseball ball.
Drill 2: Lobbing the Ball in the Air
Purposes:
This is one of the baseball fielding drills that enhances the footwork timing efficiency. It also enhances the catching fundamentals as well as measuring the ball’s movement.
How to Practice?
The players will stand in a line. The coach will lob the ball from at least 90 feet away. You (the coach) will lob the ball as high as possible.
The front-most player of the line will step forward with his glove and let the ball land on his left side.
He will land his glove-side foot exactly at the same time when he catches the ball on his left. After catching the ball, the player will go back to the end of the line, and the next player will practice catching the lobbed ball with the same strategy.
Drill 3: Running Catch
Purposes:
The goal of this drill is to develop the running techniques, as well as the catching while running. This will also enhance the accuracy of catching while running.
Another purpose of the drill is to improve the range of fielding in the outfield, along with improving the angles and lines.
How to Perform?
The players will jog around the coach. The coach will toss the ball as high as possible while maintaining a minimum distance.
The fielder will run and track the ball. He must try to run and then catch the ball. The coach will toss the ball to both the right and left sides of the players, one after another.
This drill should be continued 10 times for each player: 5 to the right side and 5 to the left side. This drill will improve the running, angles, and footwork at the same time.
Drill 4: Drop Step Drill
Purposes:
This is one of the baseball fielding drills that also works on developing the catching ability while running. This also enhances the running acceleration in the first step. This also improves and enhances the range of catching the ball.
How to Perform?
This outfield baseball fielding drill is almost the same as the previous one, catching the ball while running. But, it has a fundamental difference in the starting.
Unlike the previous one, the coach will throw the ball while the player will stand near the coach over his shoulder. The player will run immediately after the coach throws the ball.
This enhances the motor mechanics of acceleration of running of the player. This also improves the reflex action of the players.
The coach will throw the next ball for the next player in the line immediately after the previous player catches the ball while running.
Drill 5: Fast-Throwing Drill
Purposes
Practicing this drill will develop the mechanics of fast throwing of an outfielder. This will also work on the timing and footwork as well.
How to Perform?
Before starting the drill, remember the purpose of the drill is to develop fast throwing from the outfield, not covering the distance initially.
By the way, make a group of 5 players and let them stand in front of a wall with a distance of 50 to 60 feet. In the place of the wall, you can keep an assistant to receive the thrown balls.
Make sure the player’s stance is like he caught a bouncing ball. He must keep the glove-side foot forward. Now give the ball to him. He will put the ball on his gloved hand, then take the ball back with the throwing hand.
Immediately after taking the ball from the gloved hand, the player will throw the ball to the wall/partner 60 feet away in front of him.
The player must do this with maximum speed. By this time, he will balance his footwork and take the ball from the gloved hand.
With every throw, the player must ensure the speed of taking and throwing the ball with accuracy. As I already mentioned before, distance isn’t the main concern here.
Drill 6: Long Toss Relay Drill
Purposes
This drill is to cover a decent distance with accuracy. It will also work on the proper timing and footwork of the players.
How to Perform?
Multiple players will stand away from a particular place. You can either use the baseball field’s bases or make the line away from a wall.
The distance should be 100 feet: a little more or less.
Now, the player will form a line. You will roll the baseball ball in front of the front-most player of the line at a slow pace so that the ball gets around the player and stops.
Now, the first player of the line will crow hop, take the ball with his throwing hand, and will throw the ball with the maximum strength to the wall or to the base, whatever you are using.
Make sure the players give their maximum effort and strength to cover the distance. Since it’s a fast relay, the first player of the line will go back to the end of the line, and the next player will do the same.
The relay should be continued until the last player of the line as a cycle. The players must coordinate their footwork, accuracy, and speed during the throwing.
The main purpose of the drill is to improve the throwing distance by ensuring speed and accuracy.
Drill 7: 4-Man Outfield Drill
Figure: 4-Man Outfield Drill
Purposes
Improving the fielding of fly balls and ground balls in the outfield. The setup of the drill also develops cutoff throws.
How to Perform?
Before starting the drill, you have to understand the setup position properly. In this drill, the position is important. Also, you have to rotate the positions of the players after completing each cycle.
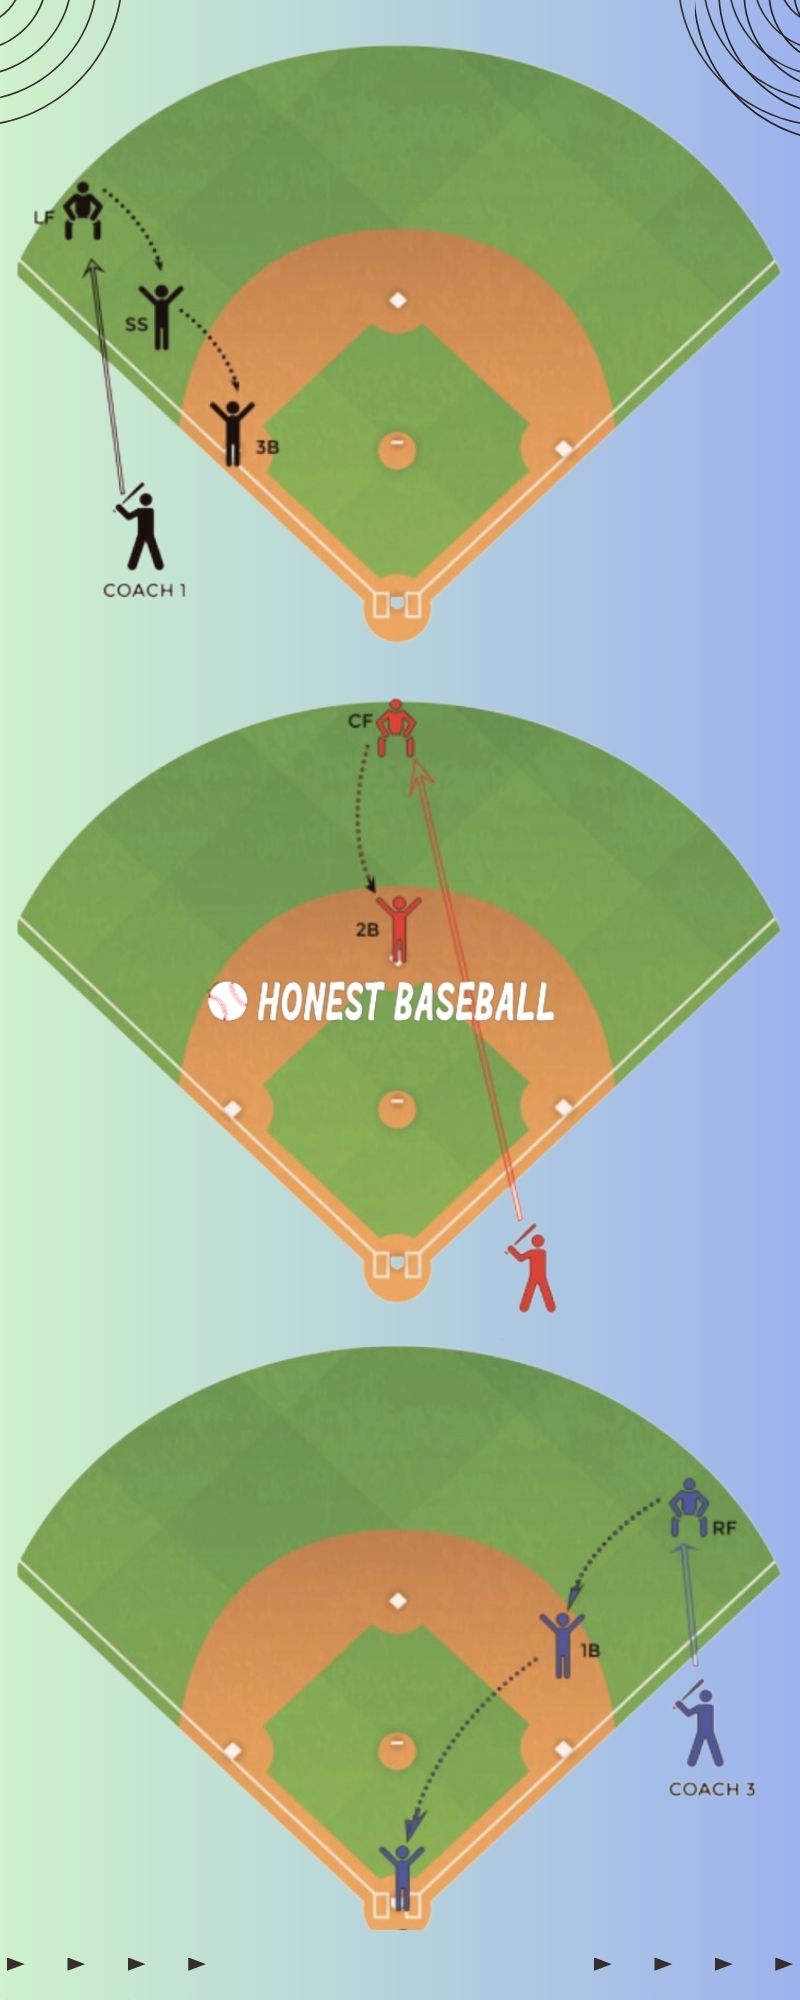
However, let’s start. The drill will be performed in two phases. Please follow the following diagram to set up the position of 4 players.
By the way, I haven’t created the diagram. I just collected it on the internet, and it is the exact thing that I am going to talk about.
Phase 1:
Set the position between players 1 and 2 at around 20 feet distance. Do the same for players 3 and 4. These two groups should have a distance of 100 to 150 feet between them.
- Player 2 will roll a ground ball to player 1. Player 1 will field the ground ball and will throw a high-fly ball to fielder 3.
- Player 3 will catch the high-fly ball and then roll the ball to player 4. Player 4 will field the ground ball and will throw a high fly ball to player 2.
- Repeat the cycle for 3 rounds. Now, rotate the positions of the players clockwise.
Phase 2:
As of now, you might already understand the cycle. In the previous cycle, player 1 and player 4 fielded ground balls, and player 2 and player 3 fielded high fly balls.
After rotating the positions, player 2 is now in the position of player 1, player 1 is in the position of player 3, player 3 is in the position of player 4, and player 4 is in the position of player 2.
Now, repeat the previous rounds that the players have done in phase 1. What happens is the fielding pattern will be changed, and the fielders who practiced catching ground balls in phase 1, will field the high fly balls, and vice versa.
Baseball Fielding Drills: Combined Drills
In this part, I will talk about some combined baseball fielding drills that will cover all positions. Also, these drills need all positions loaded.
Drill 1: Outfield Cutoff Throw 1
Purpose:
Outfielders and infielders will perform this drill combined. They will perform outfield cutoff throwing in this drill.
How to Perform?
First, you have to set the positions. You will need two more assistant coaches with you. Here’s the setup.
- RfF, LF, and CF will cover their regular positions.
- Catcher, 2B, and 3B will also cover their regular positions.
- 1B will cover the short right cutoff
- SS will cover the short left cutoff
- Three coaches will cover three different positions. Please follow the diagram below for the coaches’ positions.
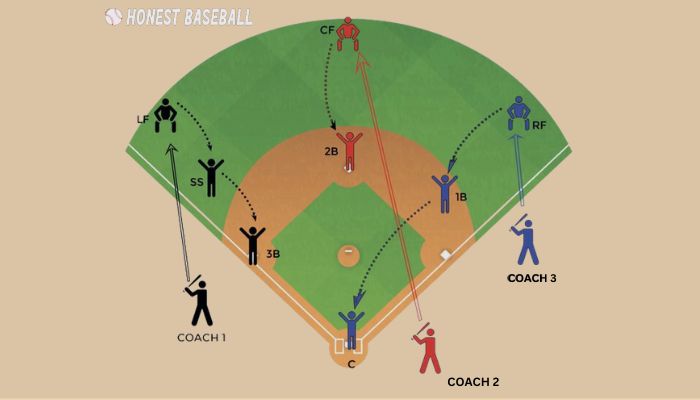
Now, if you notice, you will see that three different groups are created. So, you can name the groups Black, Red, and Blue.
Here’s the execution of the drill. Remember, three groups will perform the drill simultaneously. The outfield cutoff is a relay throw, where the players will throw the ball at a chest to head high to one player, then the receiver will throw it to the player in the final destination.
Cutoff throw enhances the speed of passing the ball to the targeted position from the outfielder to the basemen.
- Group 1: Black Group (Coach 1, SS, LF, and 3B)
- Coach 1 (suppose you are coach 1) will hit a ground ball to the LF with a Fungo.
- The LF will throw the cutoff to SS.
- The SS will throw the cutoff to 3B.
- The 3B will return the ball to coach 1.
The drill will be continued for multiple cycles.
- Group 2: Red Group (Coach 2, RF, and CF)
- Coach 2 will hit a ground ball to CF with the Fungo
- The CF will directly throw the ball to the 2B. Since there is no other position between the CF and the 2B, this won’t actually be a cutoff but rather a direct throw from the outfield to the infield.
- The 2B will return the ball to coach 2, and the drill will continue for several cycles.
- Group 3: Blue Group (Coach 3, C, 1B, and RF)
- Coach 3 will hit the ground ball to RF
- RF will throw the cutoff to 1B
- 1B will throw the cutoff to C.
- C will return the ball to coach 3 and the cycle will be continued multiple times.
By the way, the round will be the same for all three groups, and as I mentioned before, all three groups will perform the drill simultaneously.
Catcher is among the most crucial positions in baseball fielding. Here’s how a catcher can develop his catching skills with the most effective catching drills. Check the guide on “Baseball Drills for Catchers | Master the Catcher’s Box with Coach Jason.”
Drill 2: Uncertain Cutoff Drill

Purposes
In this drill, the outfielders will improve their reflection throw. They will respond to an infielder who will command to throw the ball to himself at any time.
How to Perform?
First, you have to set up the positions. All three outfielders will stand in their positions.
Now, they will start to throw the ball to each other. There will be only one ball, and there is no particular pattern for this.
At the same time, the infielder will wait. He can stand on any base. The infielder will yell “cut” all of a sudden.
At this moment, the outfielder, whoever holds the ball, will cut and throw the ball to the infielder.
To more precisely give the signal, the infielder will use the base number with the cut. Like, if the infielder is on first base, he will yell, “cut 1.”
For home plate, the signal will be “cut 4.”
As a coach, you have to make fielders understand the meaning of the yell. To ease the cut throws, you can position the infielder in a particular base.
To make the drill a little harder, the infielder can roam around the bases and can yell from any base.
Frequently Asked Questions
Here are some additional queries you may ask about baseball fielding drills. Let’s have a look at them.
1. What is good fielding?
Great infielders in baseball have a fielding percentage of .970 or higher. In other words, they succeeded 970 times out of 1,000 attempts at error-free fielding or better.
2. What are the 3 basic skills in baseball fielding?
In baseball fielding, baseball fielders must have 3 basic skills. They are running, fielding, or catching balls efficiently and throwing the ball to the target.
3. Why is fielding important in baseball?
Fielding is important because the fielding team, or defensive team, must check the offensive team from getting runs. The faster the defensive team can put the hitters and check the run as low as possible, the chance for the team to win increases.
The Bottom Line
Baseball fielding the root to the defensive players to check the runs and get out the hitters and baserunners. At the same time, fielding drills are the foundation of good fielding.
Baseball fielding drills will give the players strength and accuracy in fielding and throwing balls. Drills also enhance the ability of fielding mechanics, footwork, and confidence.
There are a lot of drills you can follow for your players, and there is no bound. But the drill I have discussed is among the basic ones that build the foundations of fielding for the players. So, perform them in the right manner to get the maximum results.
Good luck to your team.
You May Also Like:
Baseball Drills For 10-Year-Olds- The Rulebook
How To Throw A Sinker | Learn From A Coach
Baseball Drills for 8-Year-Olds | Building Strong Foundation
Hello everyone. My name is Jason Butler, and I live in California, America. I was a professional AAA Minor League Baseball player. I lost my chance of playing MLB for injury issues, but I did not lose my love for baseball. I attended the coaching training program and am now working as a coach in a small school in San Diego.
I always love to share my experience and knowledge if that can help you. Play baseball, and stay fit.