
Standing in the center circle with the game on the line is the most high-pressure job in youth sports. But here is the hard truth for beginners: you cannot rush softball pitching fundamentals.
Many young athletes (and eager parents!) don’t realize how complex this position truly is. Skipping the basics will only lead to wild pitches, frustration, or worse—arm injuries. Even a tiny flaw in your posture, grip, or fatigue level can completely destroy a pitch’s accuracy. Building a great pitcher takes time, patience, and parental guidance to find the style that works best for them.
A Quick Note on Styles: Fastpitch vs. Slowpitch Before we dive into the mechanics, it is crucial to clarify that this guide focuses entirely on the Fastpitch (Windmill) pitching style. While slowpitch softball requires a simple, relaxed high-arc lob, fastpitch is an explosive, highly athletic movement involving a full 360-degree arm circle and aggressive leg drive.
If your goal is to build a dominant fastpitch pitcher from the ground up, you are in the exact right place. Pitching advice can be confusing, so I will keep this short and sweet. Below, I have outlined the 9 fundamental actions of the fastpitch motion to help you teach your kids the right way. Let’s get to work!
Is Your Pitch Missing the Mark? Fix It Instantly!
Even the best pitchers struggle with control sometimes. If your pitches are consistently missing the strike zone, it is rarely a problem with your arm strength—it is almost always a mechanical flaw in your release or footwork. Select where your pitch is missing below, and Coach Jason will tell you exactly how to fix it!
🥎 Pitching Troubleshooter
Where is the pitch consistently missing?
Pitching for Beginners in Softball
The following tips for beginner pitchers in softball help them gain a feel for each part of the pitch before putting it all together. Pitchers must master the intricacies and actions of the full pitch before studying a drop or curve ball.
Taking things one step at a time lets you direct your team’s attention to whatever you think is most important. This lets you identify your players’ weakest skills and help them improve them.
1. Grip
The fastball should be your first pitch to learn. Based on how many seams are visible while the ball is spinning toward you, fastballs may be divided into two categories: four-seam and two-seam.
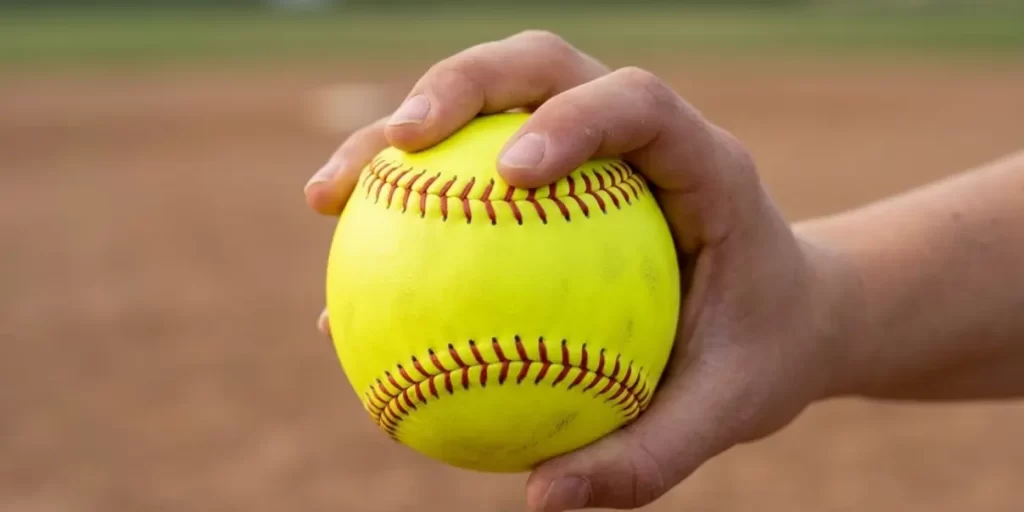
The four-seam will be your fastest and most reliable pitch. It should be the only fastball you worry about as a newbie until you throw 60% of the strikes.
The two-seam will move a little, but not as much or as fast as the four-seam. Punch grips and movements differ based on speed, hand size, and spin speed.
The two-seam fastball is often not a “go-to” pitch like the four-seam fastball, but it is an effective second strike. When you need a strike, use the four-seam.
The image below is a demonstration of a four-seam fastball grip. The ball has two forward and two backward “C’s”.

The opening should be facing you, so choose one and rest your fingers on the top, sideways. Position your thumb behind your index and middle fingers by stretching it back.
Put your pinky finger in a tuck or rest it gently on the side, but don’t really hold the ball in your hand. For a firm grip, rest the pads of your fingers against the seam.
Curl your fingers so that just the tips of your fingers touch the ball. To create spin, the “curl” plays a crucial role.
2. Stance
A pitcher’s balance and direction of his throw are greatly enhanced by her footwork and stance on the mound. Put your feet approximately shoulder-width apart and gently stagger them with your front foot on the side of your throwing arm.
If you’re just starting, the easiest way to throw a strike is to put your front heel on the rubber right in the middle of the mat. Your toes on the glove side should touch the pitching rubber but not go past it.

3. X Position and Arm Position
There are many different names for the X position.
- Power position,
- The K position and
- Position 12 o’clock.
Call it the striking posture, the punching stance, or the punching triangle, but once you’re in this position in your motion, striking is a breeze.
Land with your toes at 90 to 45 degrees on the power line.
In a proper throwing stance, the thrower’s arm is extended but not locked, the palm of the throwing hand faces away from the body, and the arm circle rests on the toes. Your arm will be visibly bent at the elbow, and your torso and head will be erect with your gaze fixed on the target.
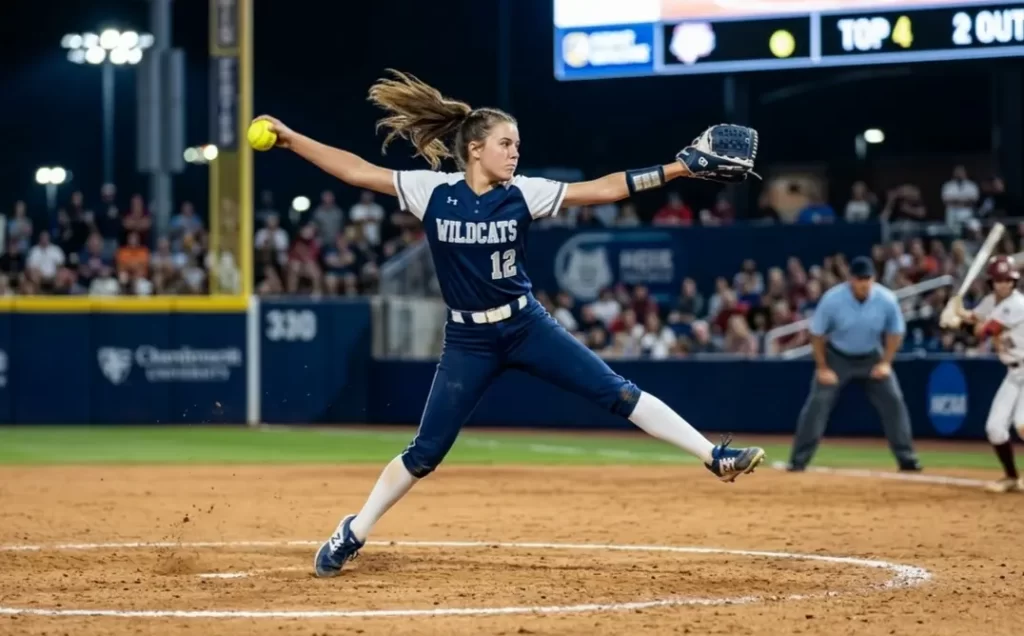
The photo below depicts a pitcher in X posture with her arms looping in front of her body and toes.
Among 10 million softball players in the USA, roughly 90 percent of them are girls. But why is the number so one-sided? Why Do Girls Play Softball And Boys Play Baseball? All your questions are answered here.

4. Arm Movements
A softball swing is composed of several discrete acts. Recognizing each element of the swing can help your team improve their pitches.
Check out these movements that make up a swing:
- Backswing
- Arm rotation
- Final downswing
- Release
- Follow-through
Back Swing– In my opinion, you should not put too much emphasis on the backswing. The backswing only sets the stage for the rest of the swing.
Players should try out different backswings in training until they find one that is good for them. Many people think a backswing is parallel to the ground. Others have different opinions.
Arm rotation in softball– For swing, arm rotation is very important because it affects how hard your pitch is thrown. Your arm and body will go forward automatically after the backswing.
Make sure the players rotate their arms at the same speed from start to end. Just maintain the power and the strength, and the pitchers can guarantee that their pitches travel at top speed.
One more important thing to keep the arm around. Keep the arm straight in line but do not ‘lock it’ out. This is a cause of serious arm injury.
Final Down Swing– Because the ball’s trajectory is so sensitive to so many different factors, the release is perhaps the most challenging part of the swing. Pitchers should maintain their wrists back as their arms come into their last downswing to maximize the ball’s snap.
Release– Keep your hand in that raised position as you let go. Before releasing the ball, the pitcher should look towards her palm, not the back of her hand.

5. Body’s Orientation
The body’s orientation is often overlooked, but this is a very important aspect. Pitchers should maintain their posture and avoid folding at the waist or bending to one side.
Keep the pitching arm outstretched to maintain a good posture, as it maximizes your pitching speed and power.
Pitchers should maintain complete body and head stability throughout the pitch, particularly during the release. It reduces their risk of injury and increases the accuracy of their throws.
The arm should be waist-high or slightly higher while pitching. This is the best strike zone, and good, fair pitches will be made most of the time.
Follow-Through– Pitchers must have a good follow-through after they throw the ball. The consistency of the follow-through is more crucial than its expertise and style.
Pitchers should always let their arms keep moving, so they don’t get hurt. Many players’ follow-throughs almost reach their shoulders, and their arms bend at the elbow.
Many pitchers find this stance natural and comfortable, but it’s not the optimum follow-through.
Is the baseball swing the same as the softball swing? Here I explained Softball swing vs baseball swing.
6. Perfecting the Footwork (The Engine of the Pitch)
While the arm circle gets all the attention, the real power and speed of a fastpitch pitch come from the legs.
The leg and body motion of a pitcher moves in a simple, continuous rhythm: Closed, Open, Closed.
- Closed: You start squarely facing the catcher.
- Open: As you take a step forward and your arm rotates upward, your body opens up sideways toward the third or first base dugout.
- Closed: During the final downswing to release the ball, your hips aggressively snap closed to face the catcher once again.
The Secret to Speed: Stride Length
The longer your stride, the more forward momentum you place behind the softball. A good rule of thumb is to encourage your players to take a stride that is roughly equal to their own height.
Telling a player to “stride 6 feet” is confusing. Instead, place a practice cone on the ground exactly where you want their glove-foot to land. This gives them a clear visual target and builds the muscle memory needed for a long, consistent stride!
The 3 Elements of Pitching Footwork
Depending on the pitcher’s skill level, they will use a combination of these footwork techniques:
1. The Stepping Stride (Best for Beginners): This is the safest and most basic method. The pitcher simply steps forward with their glove foot as the arm completes its rotation. Because it is a shorter, controlled step, it allows beginners to focus purely on accuracy, balance, and mastering the arm circle without stumbling.
2. The Leaping Stride (For Advanced Power): This generates massive speed by pushing aggressively off the pitching rubber. However, a true “leap”—where both feet leave the ground at the same time—is illegal in fastpitch softball rulebooks. This brings us to the most important mechanic…
3. The Drag (Making the Leap Legal): To prevent an illegal leap, pitchers must drag their back foot (the pitching foot) across the dirt while the front foot strides forward.
- How to do it correctly: Point your back foot down like a ballerina and lightly drag the inside of your big toe across the ground. If you push down too hard, you’ll get stuck in the dirt and lose speed. If you jump too explosively, your toe will leave the ground, resulting in an illegal pitch call!
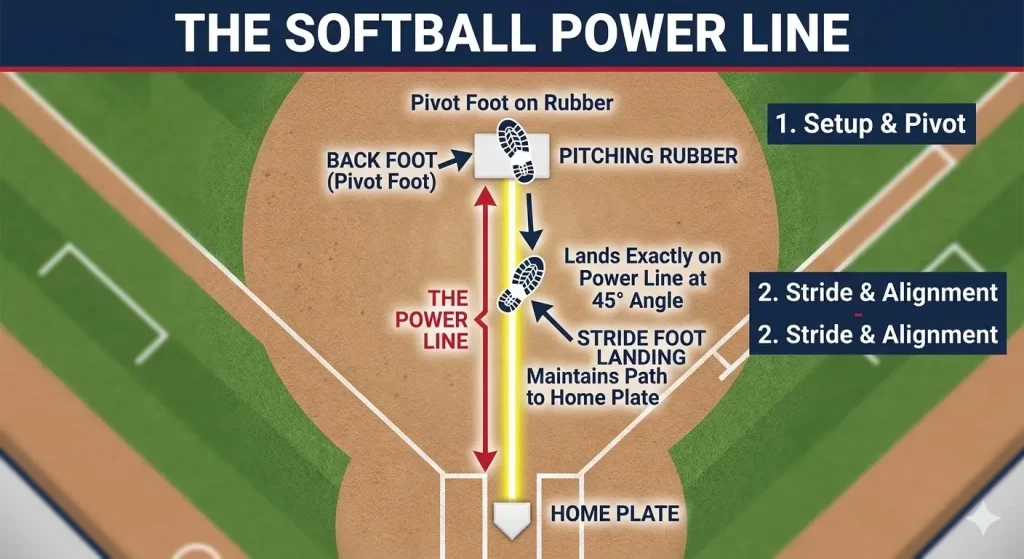
7. Power Line and Stride Length
Power Line has become the go-to place for softball skill development. The power line is centered on the pitcher’s mound and extends to the edge of home plate.
Your stride leg should fall on the power line with the toe angled 45 to 90 degrees from it. Beginners should aim for 90 degrees and hope the toe falls between 90 and 45, as 45 degrees is tough.
Your focus here is on pitch direction and maintaining balance on the mound. Generally, you throw from where you step. Therefore you should constantly go in that direction.
Your body balance gives your body control and power. When a pitcher’s body loses its balance, her mind takes control and uses her arms to counterbalance the lean. Loss of arms control makes it difficult, if not impossible, for the pitcher to throw strikes, if not impossible.
As I told you earlier, your stride should be as long as your body height. You should aim to land anywhere between your fifth and sixth steps when walking, stepping heel-to-toe. If your stride isn’t long enough, try kicking extremely hard with your stride leg.

8. Spin
As you have come to the last part of the pitch, release, all you need to do is to finger roll. It will create ball rotation. The best way to learn how to spin is to throw the ball and spin it with your fingers. If you do it right, this very light and easy motion will give all pitches a drop motion.
9. Finish
There are two choices for finishing: remain sideways or pivot to face the catcher. I have taught both and succeeded with both, but I usually teach a sideways finish.
I have taught and succeeded with both, but I usually teach a sideways finish. This method is more challenging to master but results in more accurate throws.
To finish facing the target, the stride leg must turn, and the arms must make a helicopter motion. While this technique may be simpler to pick up than the sideways finish, it is harder to maintain control over your attacks. Whatever method you finish, you must accomplish two things: finish consistently and finish the throwing action before the catcher collects the ball.

Practice
Remember the saying, “As mechanics improve, so will everything else?”? Pitching for beginners does not get better by just throwing thousands of pitches.
Every pitcher has to train with a goal in mind and be open to making changes as they go through their careers. Go hard on your practice. If you practice with terrible mechanics, you can expect the same in games.
Beginner softball pitchers should practice regularly but focus on perfecting their mechanics.
Beginner softball pitchers must perfect their technique by executing air through in the mirror. To be the greatest, you need ambition and commitment! Accept nothing less than the best.
Spins
One of the practices I tell my players to do is to raise the ball upward, about 3 feet, focusing on increasing spin. Do this 400 times per week.
X Position/ Power line/ Stride
Practice stepping onto the power line, landing there, and stopping at the X position. The best way to do this is on an 8 x 6 inches board. Do this 300–500 each week.
Arm Circle
Put your feet in an X position on the power line. Practice the arm circular while keeping the ball between your toes. Remember to spin the ball to the target.
Only step or lean forward once you see a noticeable improvement in your arm control. This drill is important for learning how to throw strikes because it lets you do a lot of them with little effort.
Full motion
Learning best by doing. Practice the full motion as often as you can, but don’t force it if you’re not ready. This could result in later wrong mechanics and injury.
Start each training with 10 balls so you can get better but don’t get bad mechanics. Let the pitcher toss, but if the pitch is too fast, let it go; just go on to the next ball.
Throw till all of the balls are used, and then call it a day. Count the total number of pitches and work to improve every day. It can be counterproductive to practice too much with bad form. If you want to improve your pitch count, do this three times a week.
Top 3 Beginner Pitching Drills
Reading about the X-position and footwork is great, but how do you actually teach these mechanics to a beginner without overwhelming them? The key is to break the full windmill motion down into isolated, repeatable drills. Here are the top three drills every beginner must master:
1. Wrist Snaps (The Spin Drill)
The release is the most important part of the pitch. Have your pitcher kneel on her throwing-arm knee, about 10 feet away from the catcher. Keep the pitching arm isolated by resting the elbow against the hip. The only movement should be pulling the hand back and aggressively “snapping” the wrist to release the ball. This trains the fingers to create the perfect backward “C” spin (4-seam rotation) without worrying about legs or arm circles.
2. The K-Drill (The X-Position Release)
Once the wrist snap is mastered, it’s time to stand up. Have the pitcher stand sideways on the power line in the “K” or “X” position (arms extended, weight balanced). Without doing a full backswing or 360-circle, the pitcher simply drops her throwing arm directly down to her hip, snaps the wrist, and follows through. This teaches perfect posture and muscle memory for the final, most crucial phase of the pitch.
3. The Wall Drill (For Perfect Posture and Power Line)
Many beginners develop a bad habit of letting their throwing arm swing too far away from their body, losing all their speed. Have the pitcher stand parallel to a tall fence or a wall, with her throwing arm just a few inches away from the surface. Have her perform her pitching motion slowly. If her hand or ball scrapes the wall, her arm circle is too wide. This drill forces the arm to stay tight to the body and perfectly aligned with the target.
Never let a beginner pitcher throw a full windmill pitch on day one. Always start them on their knees focusing only on wrist snaps. Breaking the pitch down into smaller, manageable movements prevents bad habits and serious shoulder injuries!
Pitching Action in Five Easy Steps
A good pitching motion is based on a complex relationship between how the speed of body parts increases from the ground up. Make your pitching motion more professional by following these five steps.
1. With both feet on the rubber, a ball in each hand, a glove on, and a firm grip
2. Separate your hands, and place your weight on the back foot, but do not take a step back.
3. Both arms travel forward, step, and turn the body. The glove hand stops when the arms are parallel to the ground, and the ball hand continues in a circle beyond the head with the ball pointing back. You just did the “Power Position”.
4. Keep the ball in your hand, lower your glove hand and smack it on your thigh, then flip your wrist to the 6 o’clock position to let go of the ball.
5. Rotate the hips till the chest is towards the goal.
Tips for Softball Pitcher Beginner
Are you interested in a different role in softball? Don’t worry I have got you covered. Here are the best softball tips for beginners you will ever need.
Softball pitching at first may seem difficult. With proper tips and guidance, you can also master it. Here I will share some of the tips I give my players.
Proper Pitching Stance
The pitcher’s pivot foot must touch the plate in Little League Softball. To be good in pitching stance, practice aligning the pivot foot’s arch with the plate’s leading edge so that the foot may push off.
The stride foot should be on, or just behind, the rubber, and the feet should be staggered and spaced at shoulder width. Your legs must be sturdy enough to support the body.

Start and Rotation
Most often, Little Leaguers swing their throwing hand beyond their hip and into a backswing. Once the hand starts moving forward, pitchers should move their weight from their back leg to their push-off leg.
Your pitchers should rotate off the pitcher’s plate with their pivot foot, similar to sprinters leaving the starting blocks. As pitchers move toward the plate, their bodies turn sideways (right-handed pitchers’ belly buttons face the 3rd base dugout) into a K or X shape.
Finish and Follow-Through
Pitchers throw from the K or X stance, whipping their arm and the ball down toward the catcher’s glove. The arm should remain relaxed and continue to the target.
Many players may try to “lock down” a pitch or “muscle” it. You should just tell them to chill down. Little Leaguers should stand tall and keep their bodies still the whole time they pitch.
Take note of how your pitcher is holding her head and body. Is the pitch centered and hitting the glove?
If not, tell her to maintain her head as level as possible and her shoulders as level as possible. Last but not least, the stride foot needs to hit the ground hard.
If it falls softly, the acceleration will be reduced. Also, watch the length of your stride length. Balance and power are the keys, so if your pitcher is having trouble, make sure that their stride isn’t too long and stretched out.
Change Targets
One thing I have often seen is when a young player is having trouble in the circle and is frequently off-target, some coaches make the mistake of giving their pitcher a lot of corrections. What I do is tell my pitcher to adjust her aim if she often strikes out on the inside, outside, high, or low.
If the pitcher throws outside and high, tell her to aim for the catcher’s left knee instead of her glove.
Relax and Rhythm
Advise your athlete to ease up from the shoulders to the jaw. Pitching can be stressful. Let your pitchers find a rhythm that feels good and fits the pace of the game.
Make sure that your pitcher is not throwing too fast. Each pitch has to be systematic and precise.
Make the Batter Invisible
Every coach knows that a pitcher can be awesome when there’s no one in the batter’s box, but once a player steps up, the pitcher’s control is often less good. Even though it’s easier to say than to do, tell your pitcher to focus on the target and act like the batter isn’t there.
Try to tell your Little Leaguer that she and her teammate are just playing catch behind the plate.
When giving pitching tips to beginner softball players, it’s best not to go into too much depth. The information can be overwhelming to them.
They are not professional. Keeping it basic will produce good outcomes, keeping the game fun.

One way to easily boost the morale of your students is giving them gifts for their little achievements, This may seem a very little effort, but it can do much more than you will ever realize. Here are the best Softball Gifts for Team you can consider.
As important, don’t forget that you’re the coach. It’s on you to be the teacher and ensure your Little Leaguer does what he’s told.
If a pitcher is receiving too much advice from others, ensure it’s in line with what you’re teaching.
Statista observed that there are almost 10 million softball players in the United States, of which eighty-five percent are women. So, as a girl, your career opportunity in softball is enormous. My article on How To Become A Better Slow Pitch Softball Hitter will interest you heavily for the batter role in softball.
Observations To Make:
As a beginning softball pitcher, you should keep an eye on these factors.
- Does the ball start at the target while pitching?
- Keep your chin up or as high as you reach, and don’t lean at any point.
- Getting rid of outside the strike zone pitches
- Too high of a pitch, too late of a release.
- Too low of a pitch, too quick of a release.
- Not starting the arm circle in the right direction
- Maintain positive body language.
Frequently Asked Questions
1. What Is the Easiest Pitch in Softball?
Beginners softball pitchers would do well to study the screwball, a kind of breaking pitch that is both simple and effective. It’s essential to start with the basics while developing your pitches. The screwball is one kind of such pitch. Most pitchers throw a screwball sidearm.
2. What Pitch Should I Learn First?
The four-seam fastball is the first pitch that you need to learn. This is often the simplest pitch to strike a batter with. If the ball is thrown correctly, its four laces will spin as it goes through the air. This helps the throw stay on target.
3. Why Is Softball Pitching So Hard?
The ball is thrown when a major league pitcher’s arm spins inward at around 7500 degrees per second. This rotation speed makes shoulder and elbow stress challenging to tolerate.
4. What Are 3 Things You Need to Do in Order to Pitch a Softball Properly?
As a softball pitcher, you must focus on three things above all others: your balance, hip close, and wrist snap. To be a good pitcher, you need all three of these things.
5. What Makes a Good Pitcher in Softball?
Pitchers really MUST understand the importance of being highly adaptable in their profession. They need to be able to confidently and swiftly try something new if what they’ve been doing so far isn’t producing the desired results.
Wrapping Up
Pitching for Beginners in Softball is just as crucial as other practices in softball. Making a pitcher takes a lot of skills, some of which people are born with it and many of which they learn through training and hard work.
According to Seaver, “it’s an art to learn how to do it.” As the saying goes, “They have to want to do it in order to do it well.”
One thing to remember, you are in charge. Your Little Leaguer is under your care, and your job is to educate them. Avoid giving them too much guidance. They won’t be able to apply anything because they’ll grow overwhelmed.
Don’t rush! I have faith in you. Make a practice plan and accomplish things in an orderly manner. I hope that everything you are working so hard on pays out for you in the end.
You May Also Be Interested In
How Are Softball Pants Supposed To Fit: Coach’s Guide
7 Best Softball Sunglasses In 2022 [Become Stylish and Efficient]
Easton MAKO TORQ Helmer Review | The Best Sweet Spot Softball Bat
Miken Softball Glove Reviews | Let The Ball Rest Comfortably In The Model
Hello everyone. My name is Jason Butler, and I live in California, America. I was a professional AAA Minor League Baseball player. I lost my chance of playing MLB for injury issues, but I did not lose my love for baseball. I attended the coaching training program and am now working as a coach in a small school in San Diego.
I always love to share my experience and knowledge if that can help you. Play baseball, and stay fit.